Chapter 10 - Set the boiltime
Updated to Gio 0.8.0 as of April 4th 2025
Goals
The intent of this section is to add an input field to set the boiltime.
Outline
The code changes in a few ways
- Import gioui.org/text from Gio, as well as string and number manipulation from the standard library.
- Add a fourth rigid to hold the widget.Editor()
- Add some logic for the button to make it a little more well behaved.
That’s it. Let’s look at the code:
Code
1. New imports
import (
  "fmt"
  "strconv"
  "strings"

  "gioui.org/text"
)
The standard library is fairly compartmentalized, useful functionality for string-and-number manipulation comes together across these packages:
fmtwill be used to convert float to stringstrconvwill be used to convert string to floatstringswill be used to trim spaces away from the input string
From Gio:
- gioui.org/text provides supporting types for working with text. A lot of it is Font support and Caching, but we will use it for Alignment.
2. The editor widget
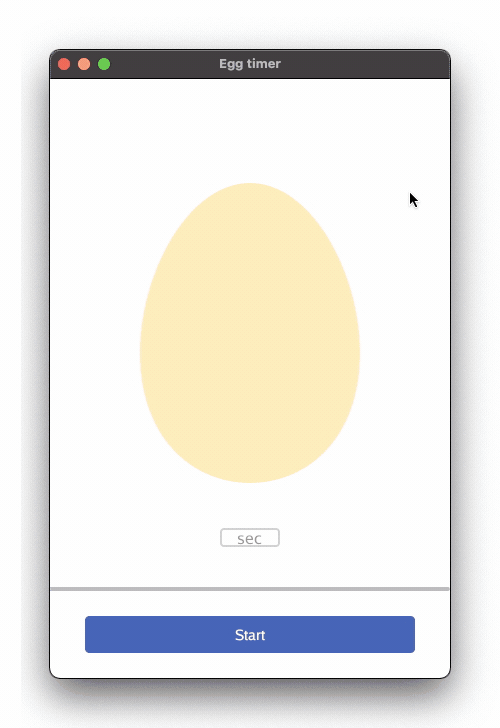
The editor widget is the input field where the chef can input how long the egg should boil.
Some variables for the editor
Just as for the button, we need a variable for the inputfield itself. So we start by declaring a widget.Editor variable.
We also create a variable to hold the actual numerical value in the inputfield and call it boilDuration. Note that there is no magical link between these variables, but we will later write code that reads from the input field, and stores the values in the boilDuration. All in due time though.
With these, we now in the top of our draw() function find the following lines:
  // boilDurationInput is a textfield to input boil duration
  var boilDurationInput widget.Editor

  // is the egg boiling?
  var boiling bool
  var boilDuration float32
3. Update boil-status and read from the inputbox
The only time we really need to check what is written in the inputbox is when the user clicks the start button. Hence we put the logic inside that if{ } block. Naturally that’s also where we control the boiling boolean. Boil bool, boil bool, boil bool - that’s a toungue twister (sorry, I know).
A simple progress check allows us to restart a fresh boil when the first has completed. Thus the code reads:
if startButton.Clicked() {
  // Start (or stop) the boil
  boiling = !boiling

  // Resetting the boil
  if progress >= 1 {
    progress = 0
  }

  // Read from the input box
  inputString := boilDurationInput.Text()
  inputString = strings.TrimSpace(inputString)
  inputFloat, _ := strconv.ParseFloat(inputString, 32)
  boilDuration = float32(inputFloat)
  boilDuration = boilDuration / (1 - progress)
}
The input variables are self evident:
boilDurationInput.Text()returns the text string inside the inputboxstrings.TrimSpace()removes leading and lagging space characters, if anystrconv.ParseFloat()converts the text to float. Note the second argument, bitsize, which is 32. From the standard library docs:- ParseFloat converts the string s to a floating-point number with the precision specified by bitSize: 32 for float32, or 64 for float64. When bitSize=32, the result still has type float64, but it will be convertible to float32 without changing its value.
- Aha. We need to explicitly convert to
float32()
Finally, a trick to link the progress and boilDuration. If a boil is, for example 20% done and the user enters a new time of 10 seconds, it’s fair to assume the user wants 10 more seconds, not only 8. So we scale it up to 12.5 by dividing by (1-progress).
Other solutions exist, like rescaling the progressbar, but adjusting the progress state variable. For simplicity we skip that step here, but just be mindful in your application how state variables might be logically related.
4. Laying it all out
Now let’s show the world our new functionality. Inside the flexbox we create a separate rigid for the input box. Since it’s below the egg and above the progressbar it will be number 2 of the four:
layout.Flex{
  // Vertical alignment, from top to bottom
  Axis: layout.Vertical,
  // Empty space is left at the start, i.e. at the top
  Spacing: layout.SpaceStart,
}.Layout(gtx,
  // 1. The egg
  layout.Rigid(
    //...
  )
  // 2. The inputbox
  layout.Rigid(
    // Add new code for displaying the inputbox here
  )
  // 3. The progressbar
  layout.Rigid(
    //...
  )
  // 4. The button
  layout.Rigid(
    //...
  )
)
5. The details of the inputbox
Now that we have the overview in place let’s examine that second rigid in detail:
Editor with theme
We start by wrapping the boilDurationInput variable in the Material Design theme. We take the occation to add a hint
// The inputbox
layout.Rigid(
  func(gtx C) D {
    // Wrap the editor in material design
    ed := material.Editor(th, &boilDurationInput, "sec")
Define characteristics
At this point, the boilDurationInput is still just an empty field, so we will do some configuration:
    // Define characteristics of the input box
    boilDurationInput.SingleLine = true
    boilDurationInput.Alignment = text.Middle
SingleLineforces the box to always be one line high. Without it, the box will grow when the user presses enterAlignmentcenters text inside the box.
Countdown
Next, since it useful to see remaining time, we count down inside the inputbox:
if boiling && progress < 1 {
  boilRemain := (1 - progress) * boilDuration
  // Format to 1 decimal.
  inputStr := fmt.Sprintf("%.1f", math.Round(float64(boilRemain)*10)/10)
  // Update the text in the inputbox
  boilDurationInput.SetText(inputStr)
}
When we are in the middle of a boil, we here define a new boilRemain that holds the remaining time until the boil is complete, calculated using (1-progress)
Since math.Round() doesn’t allow rounding to a given number of decimals, we must use a trick.
- First multiply by 10.
- Then round to zero decimals.
- Afterwards divide by 10.
- Finally convert to text with 1 decimal. It’s a little compact, but hopefully straight forward
At the end, finally some Gio again. We call SetText which replaces the text in the box with our inputStr
Layout
At this point the input box is complete. We then start laying it out:
    // Define insets ...
    margins := layout.Inset{
      Top:    unit.Dp(0),
      Right:  unit.Dp(170),
      Bottom: unit.Dp(40),
      Left:   unit.Dp(170),
    }
    // ... and borders ...
    border := widget.Border{
      Color:        color.NRGBA{R: 204, G: 204, B: 204, A: 255},
      CornerRadius: unit.Dp(3),
      Width:        unit.Dp(2),
    }
    // ... before laying it out, one inside the other
    return margins.Layout(gtx,
      func(gtx C) D {
        return border.Layout(gtx, ed.Layout)
      },
    )
  },
),
- Define margins. Note that left and right are quite large, this is how we keep the box farily small.
- Define a border with custom color and rounded corners.
- Combine 1+2 and return dimensions.
Do you see how the final layout is now like a Russian doll? Margins contain border and border contains the editor, all returning their own layout.Dimensions:
6. The progress bar
Finally, the progress indicator is reset if the previous boil was completed. This allows us to boil many eggs in a row. Neat!
To present that to the user, we expand the code to paint the button:
func(gtx C) D {
  var text string
    text = "Start"
  }
  if boiling && progress < 1 {
    text = "Stop"
  }
  if boiling && progress >= 1 {
    text = "Finished"
  }
  btn := material.Button(th, &startButton, text)
  return btn.Layout(gtx)
},
- “Start” if not boiling
- “Stop” if boiling but not finished
- “Finished” if boil has completed
Also note that, to reduce system load, let’s stop calling w.Invalidate( ) when the egg is boiled and we don’t need to redraw the app anymore. This is simply to save work.
// listen for events in the incrementor channel
go func() {
  for range progressIncrementer {
    if boiling && progress < 1 {
      progress += 1.0 / 25.0 / boilDuration
      if progress >= 1 {
        progress = 1
      }
      // Force a redraw by invalidating the frame
      w.Invalidate()
    }
  }
}()
More bells and whistles could be added here. Might I for example challenge you to set a custom background color when the boil is done?
Final comments
And that’s it. Thank you for coming along and I hope you’ve been tempted to try your hand at GUI development.
We’ve only scratched the surface, and there’s much more capability in the framework than we’ve exposed here. But, now that we have ve boiled that egg together, we’ve come quite far as well, right? Now, can I ask something of you?
If you liked what you’ve read, please star it on Github. I’m only human, and honestly it’s tremedously motivating to receive those tokens of appreciation.
And if when you get started on your own project, big or small, please drop me a line. I would love to hear from you.
Also, please make sure to follow Gio on the website, newsletter and community call.
Now, it’s finally time for breakfast. Guess what I’m having.
But wait - there’s more. After completing the ten chapters, I got wind of some extra features you might be interested in. Ready?